The major focus of my fall has been the anticipation of the birth of our granddaughter, Frances June Berg, born November 21, 2015. Her parents, Aaron Berg and Ellen Laing and big sister Della, have been here at the farm with us this fall. We are all very thankful for the arrival into our world of Frances.
Happy horses fall grazing one of the hay fields.
The horses have been having a much deserved rest, for the most part. Their biggest job these days is grinding grain for Seth, as he continues to bake bread for market and Fall CSAs. Michelle Jory of Fairmeadow Farm has been having a fall pick-up here every other Wednesday and will continue through December.
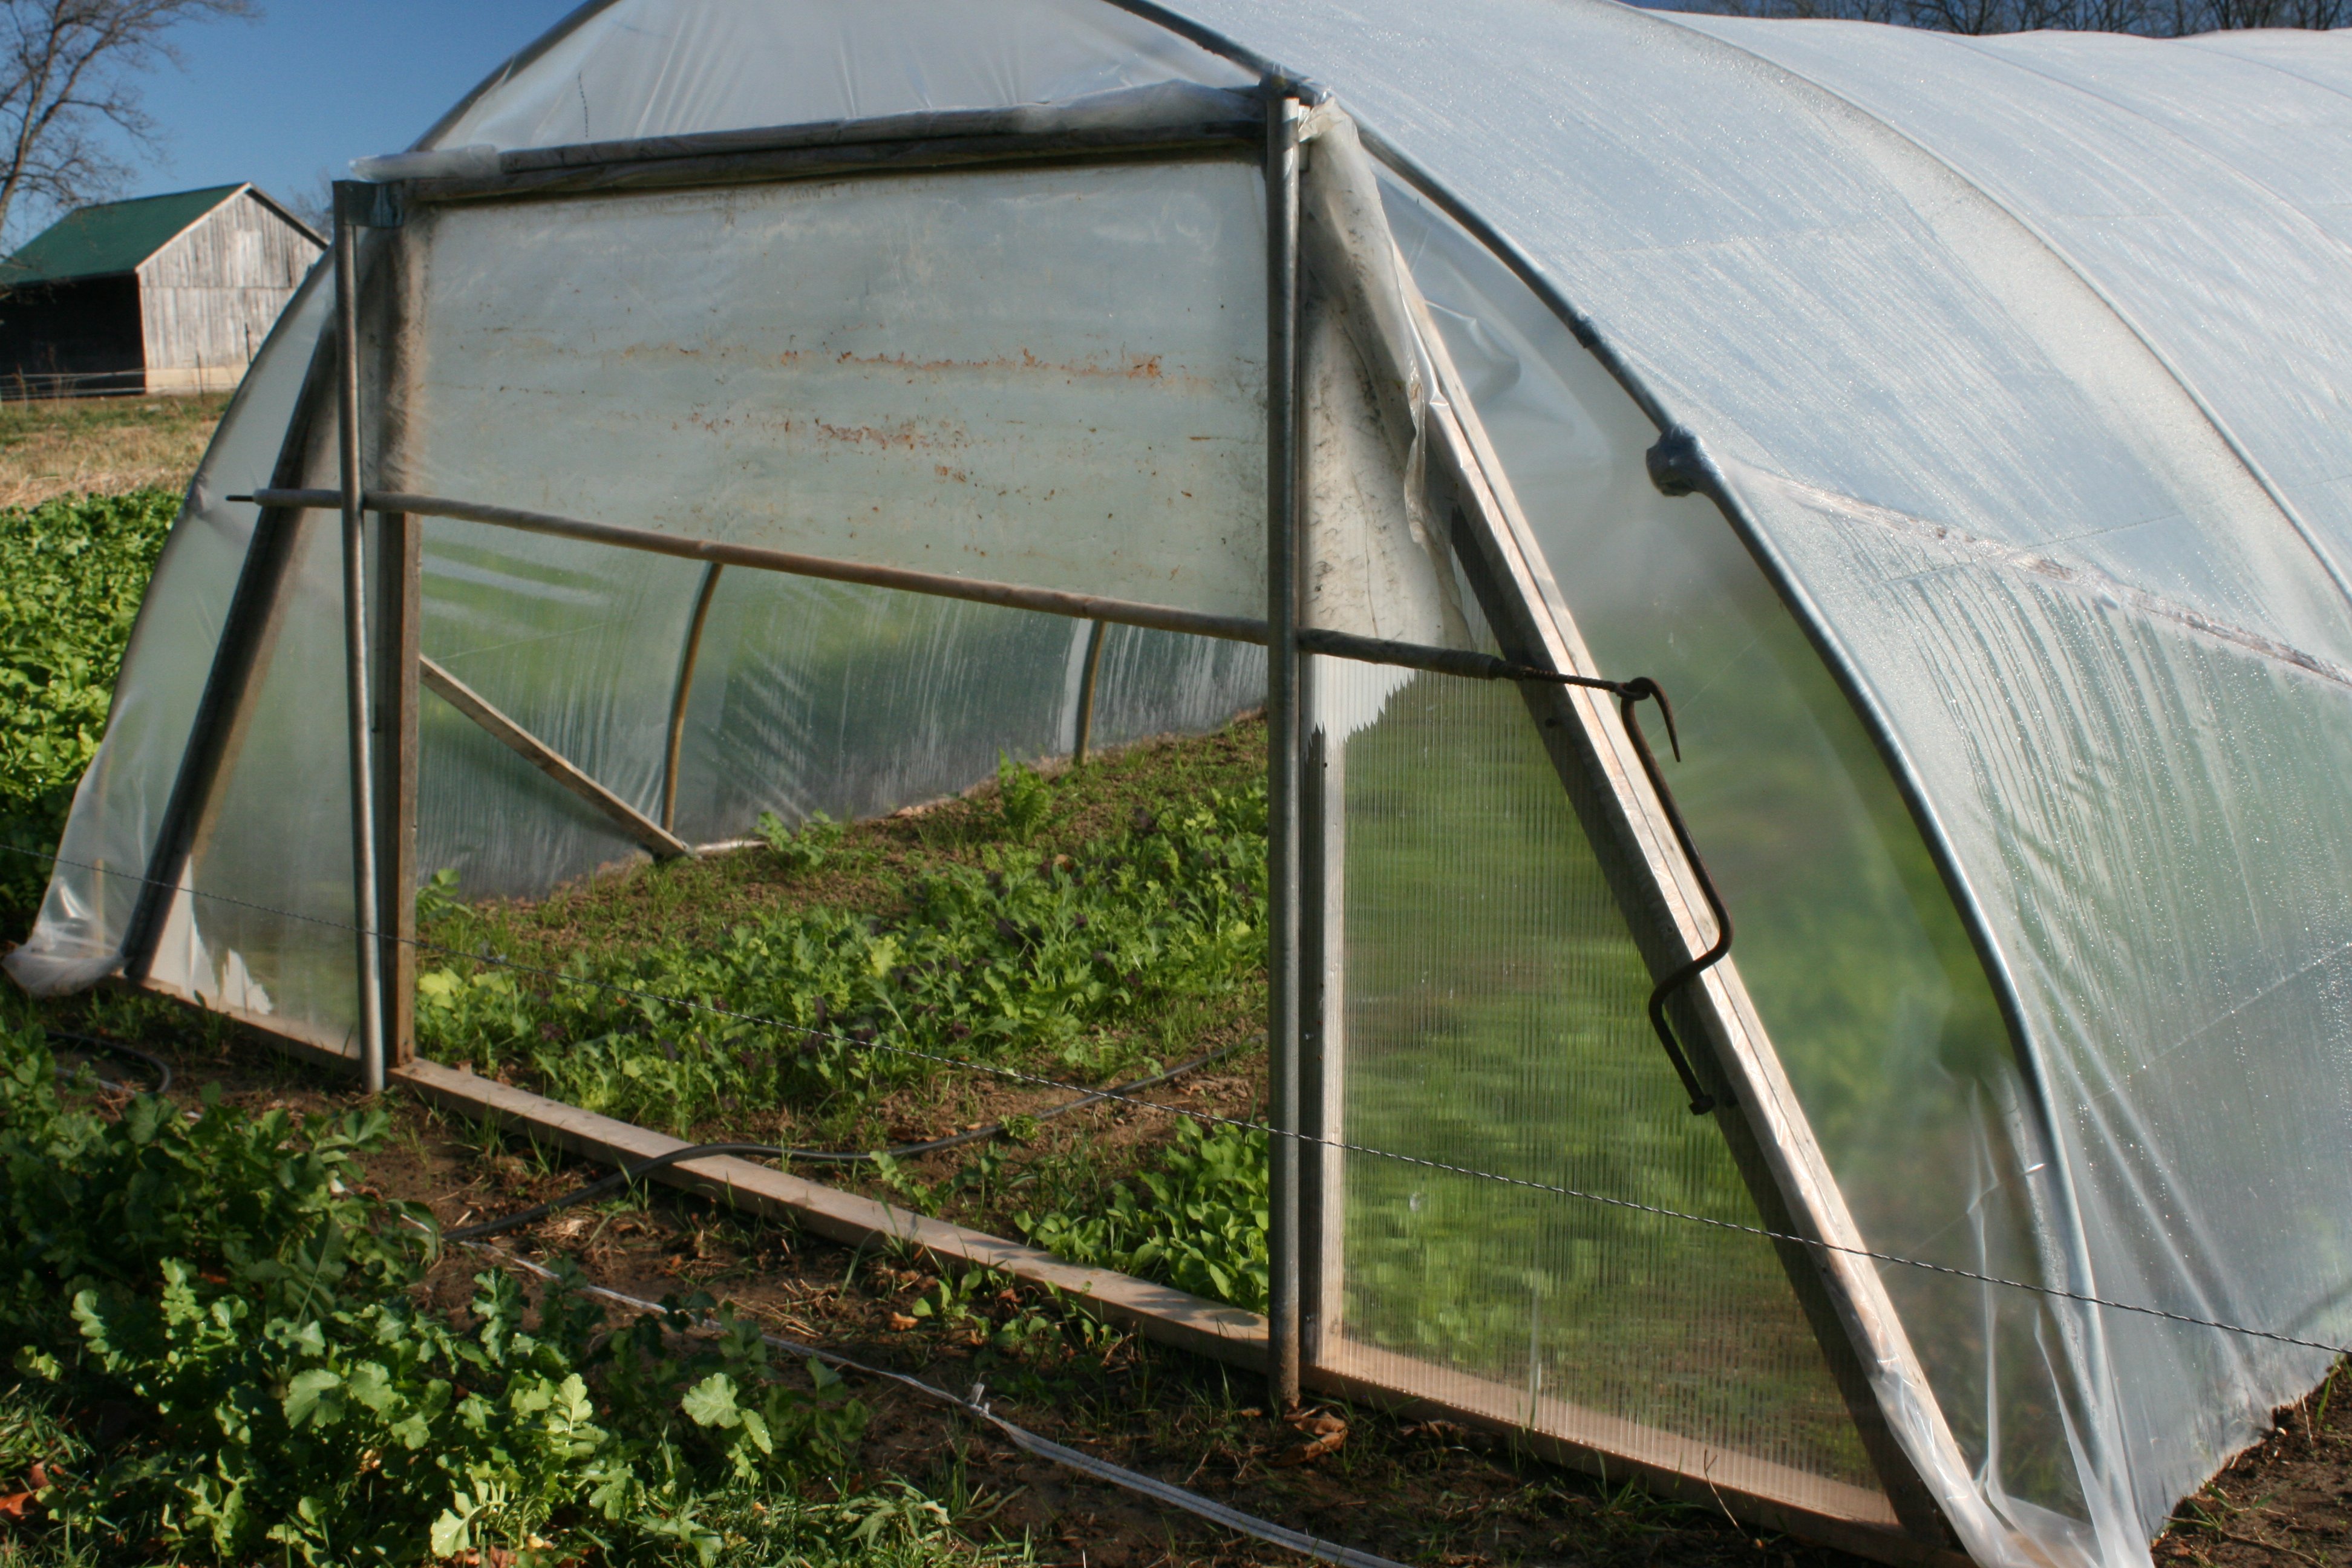
Winter Salad Greens in Hoophouse
Our cover crops have been taking off during the mild fall. The rows where the garlic was planted in October have filled in. The cover crops for the hoop house plots for 2016 have also grown well. The no-till fall planted spelt has come up as a good stand. We have been enjoying eating the fall greens that remain in the CSA garden and have also started harvesting salad from the winter hoop house. It always amazes me that seeds planted in early October can grow and be harvested throughout the winter in an unheated hoop house. I have had a bit of an adjustment not having a fall CSA and suffered some alarm at the extra produce in the Garden that I could have harvested. About 20 bushels of extra squash were donated to our local food bank. I also took some squash to a low income housing and harvested beets for sale. I am feeling ready to let go of the Garden now…
Yesterday, Ken mowed off the asparagus ferns and we expect to mulch the strawberries later this week. We will also gather up the plastic on our tomato hoop house so the the snow doesn’t over load the hoops. All in all, we are feeling ready for winter. Between preparing for a record number of farm related workshops Ken has been working hard on the farm. He spent a week on a bull dozer reshaping the head lands and water runs beside our hill side lane ways to try and direct the water runs during heavy rains to prevent erosion. The head lands were then seeded down with the good help of Jim Conrad.
2015 CSA Garden ready for winter with reshaped head lands seeded down.Diakon Radish Cover Crop in Corn FieldGarlic Field with Cover Crop Filling in the RowsDiakon Radish Cover Crop for 2016 Tomato Hoop HouseVetch Cover Crop in Cucumber Hoop HouseSpelt in no-till Field
Garlic Field Cover Crop before PlantingDella Planting GarlicPlanting Garlic
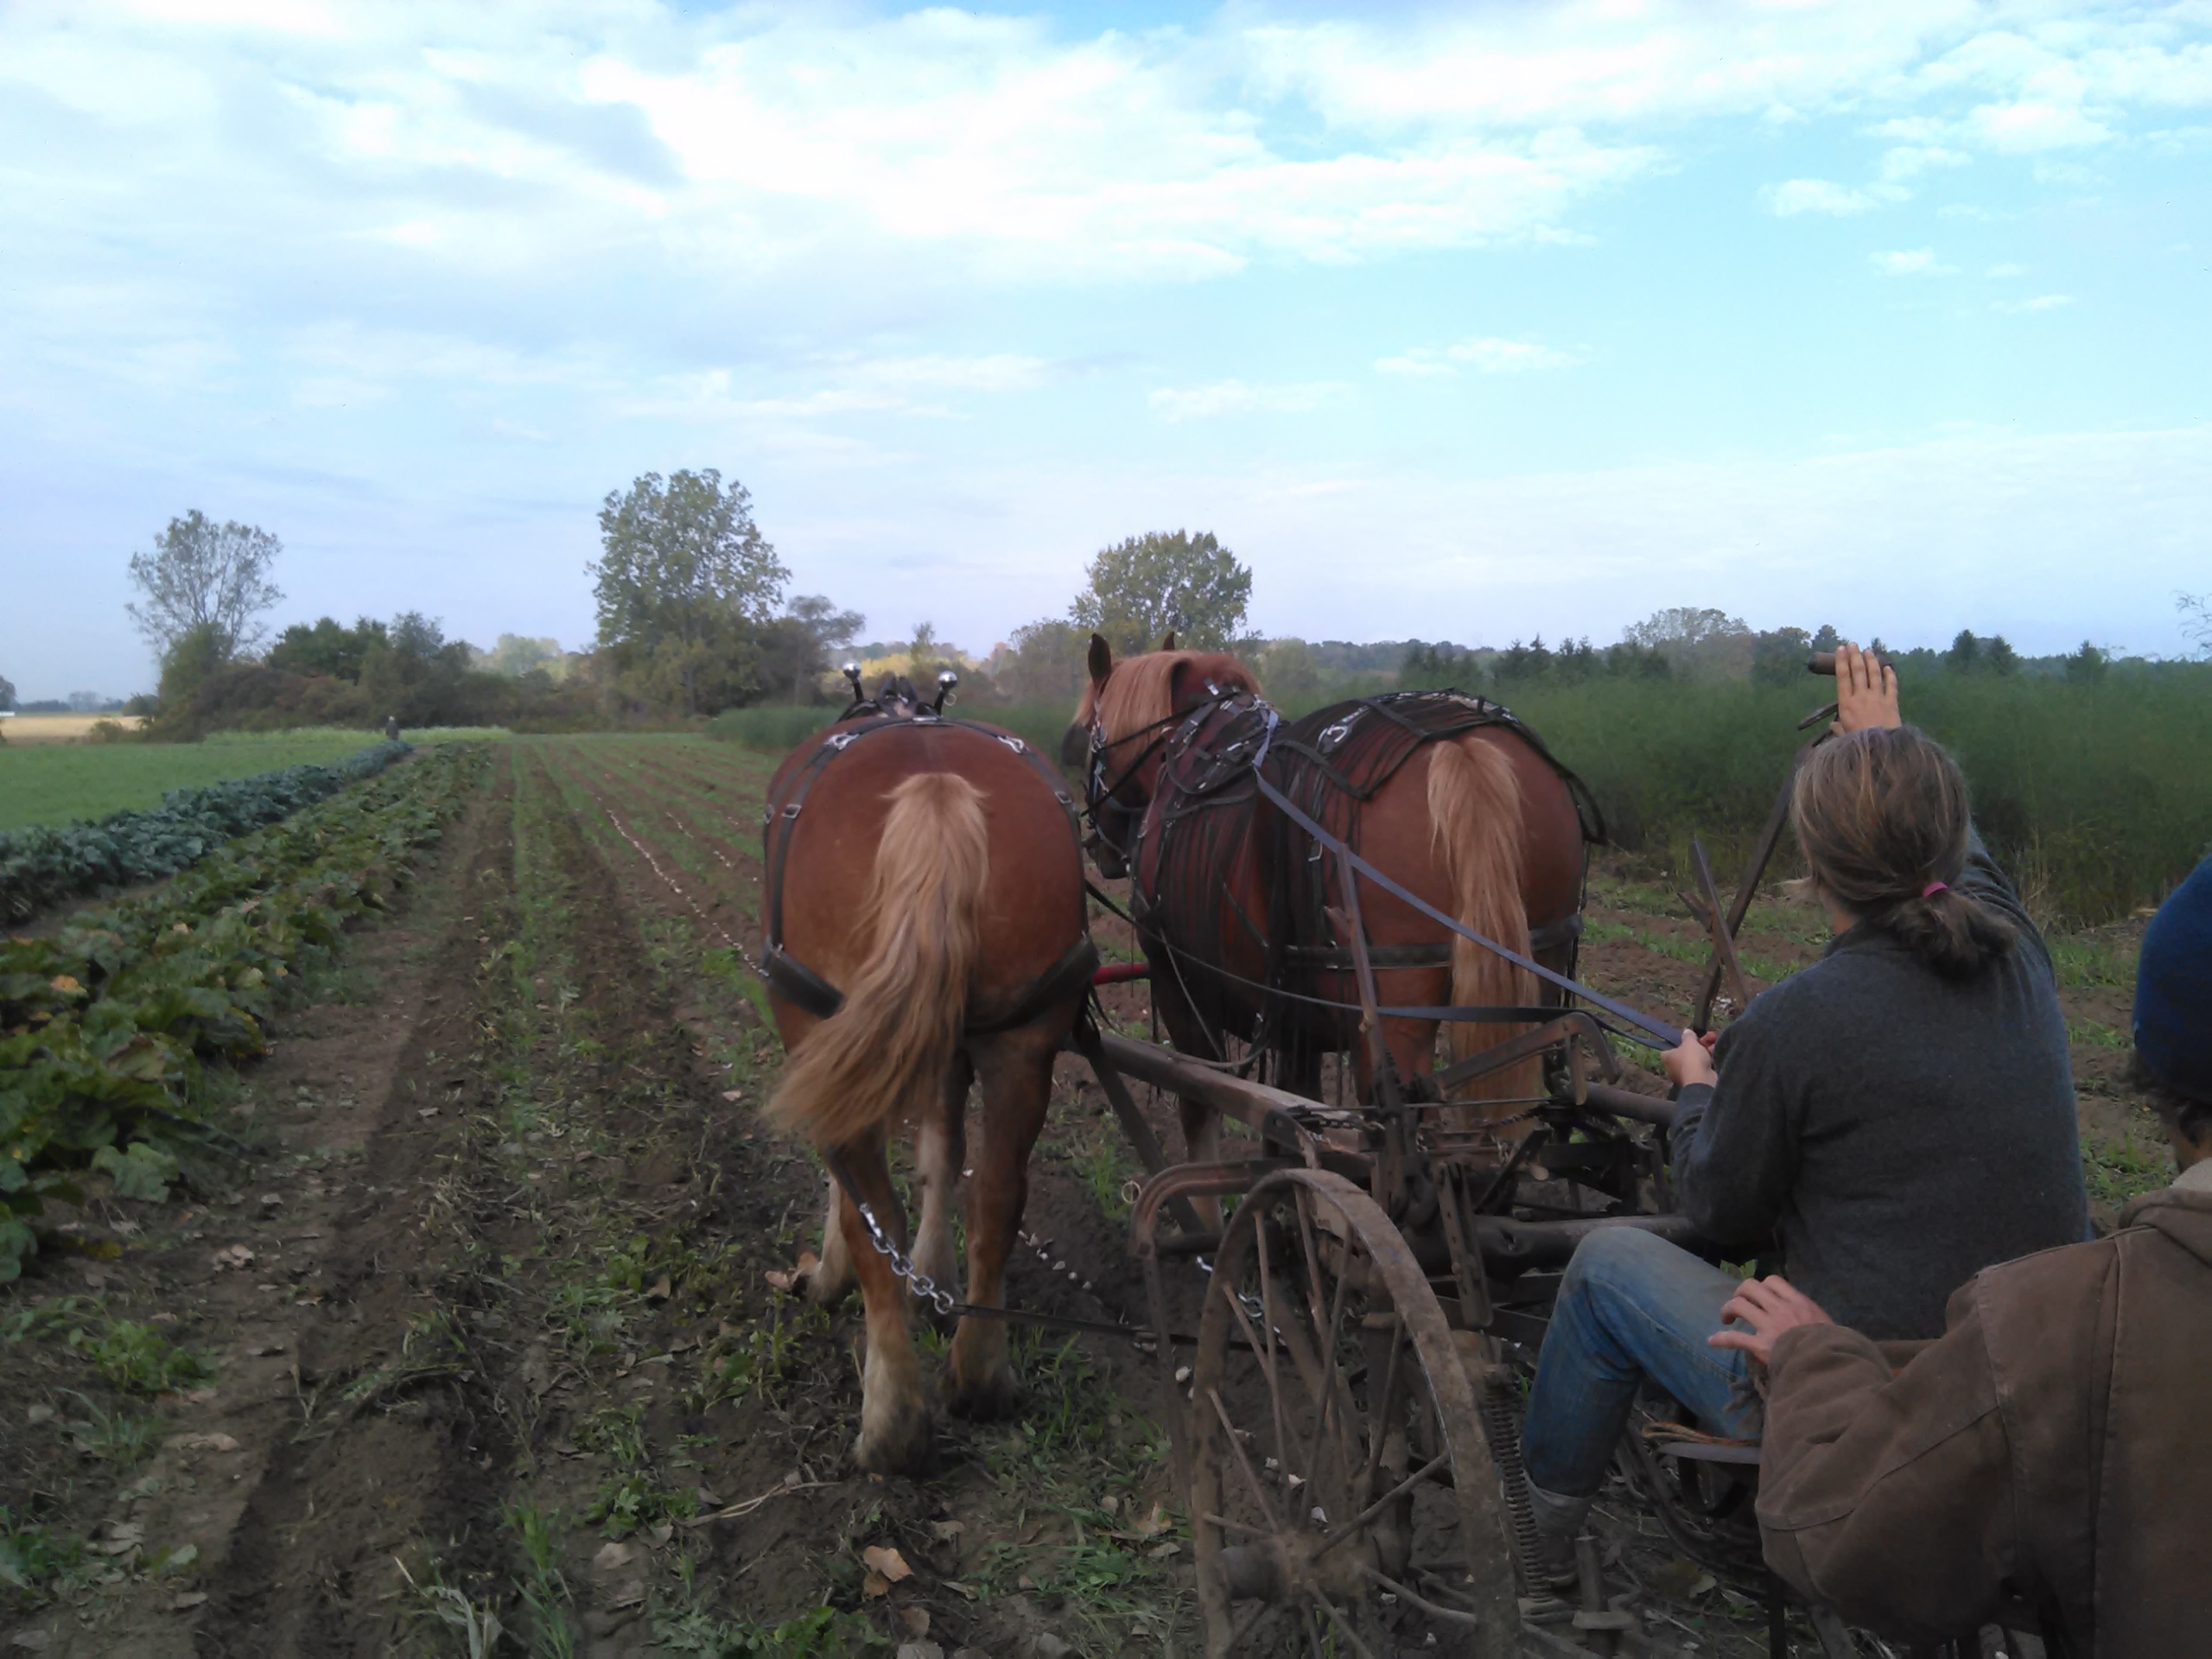
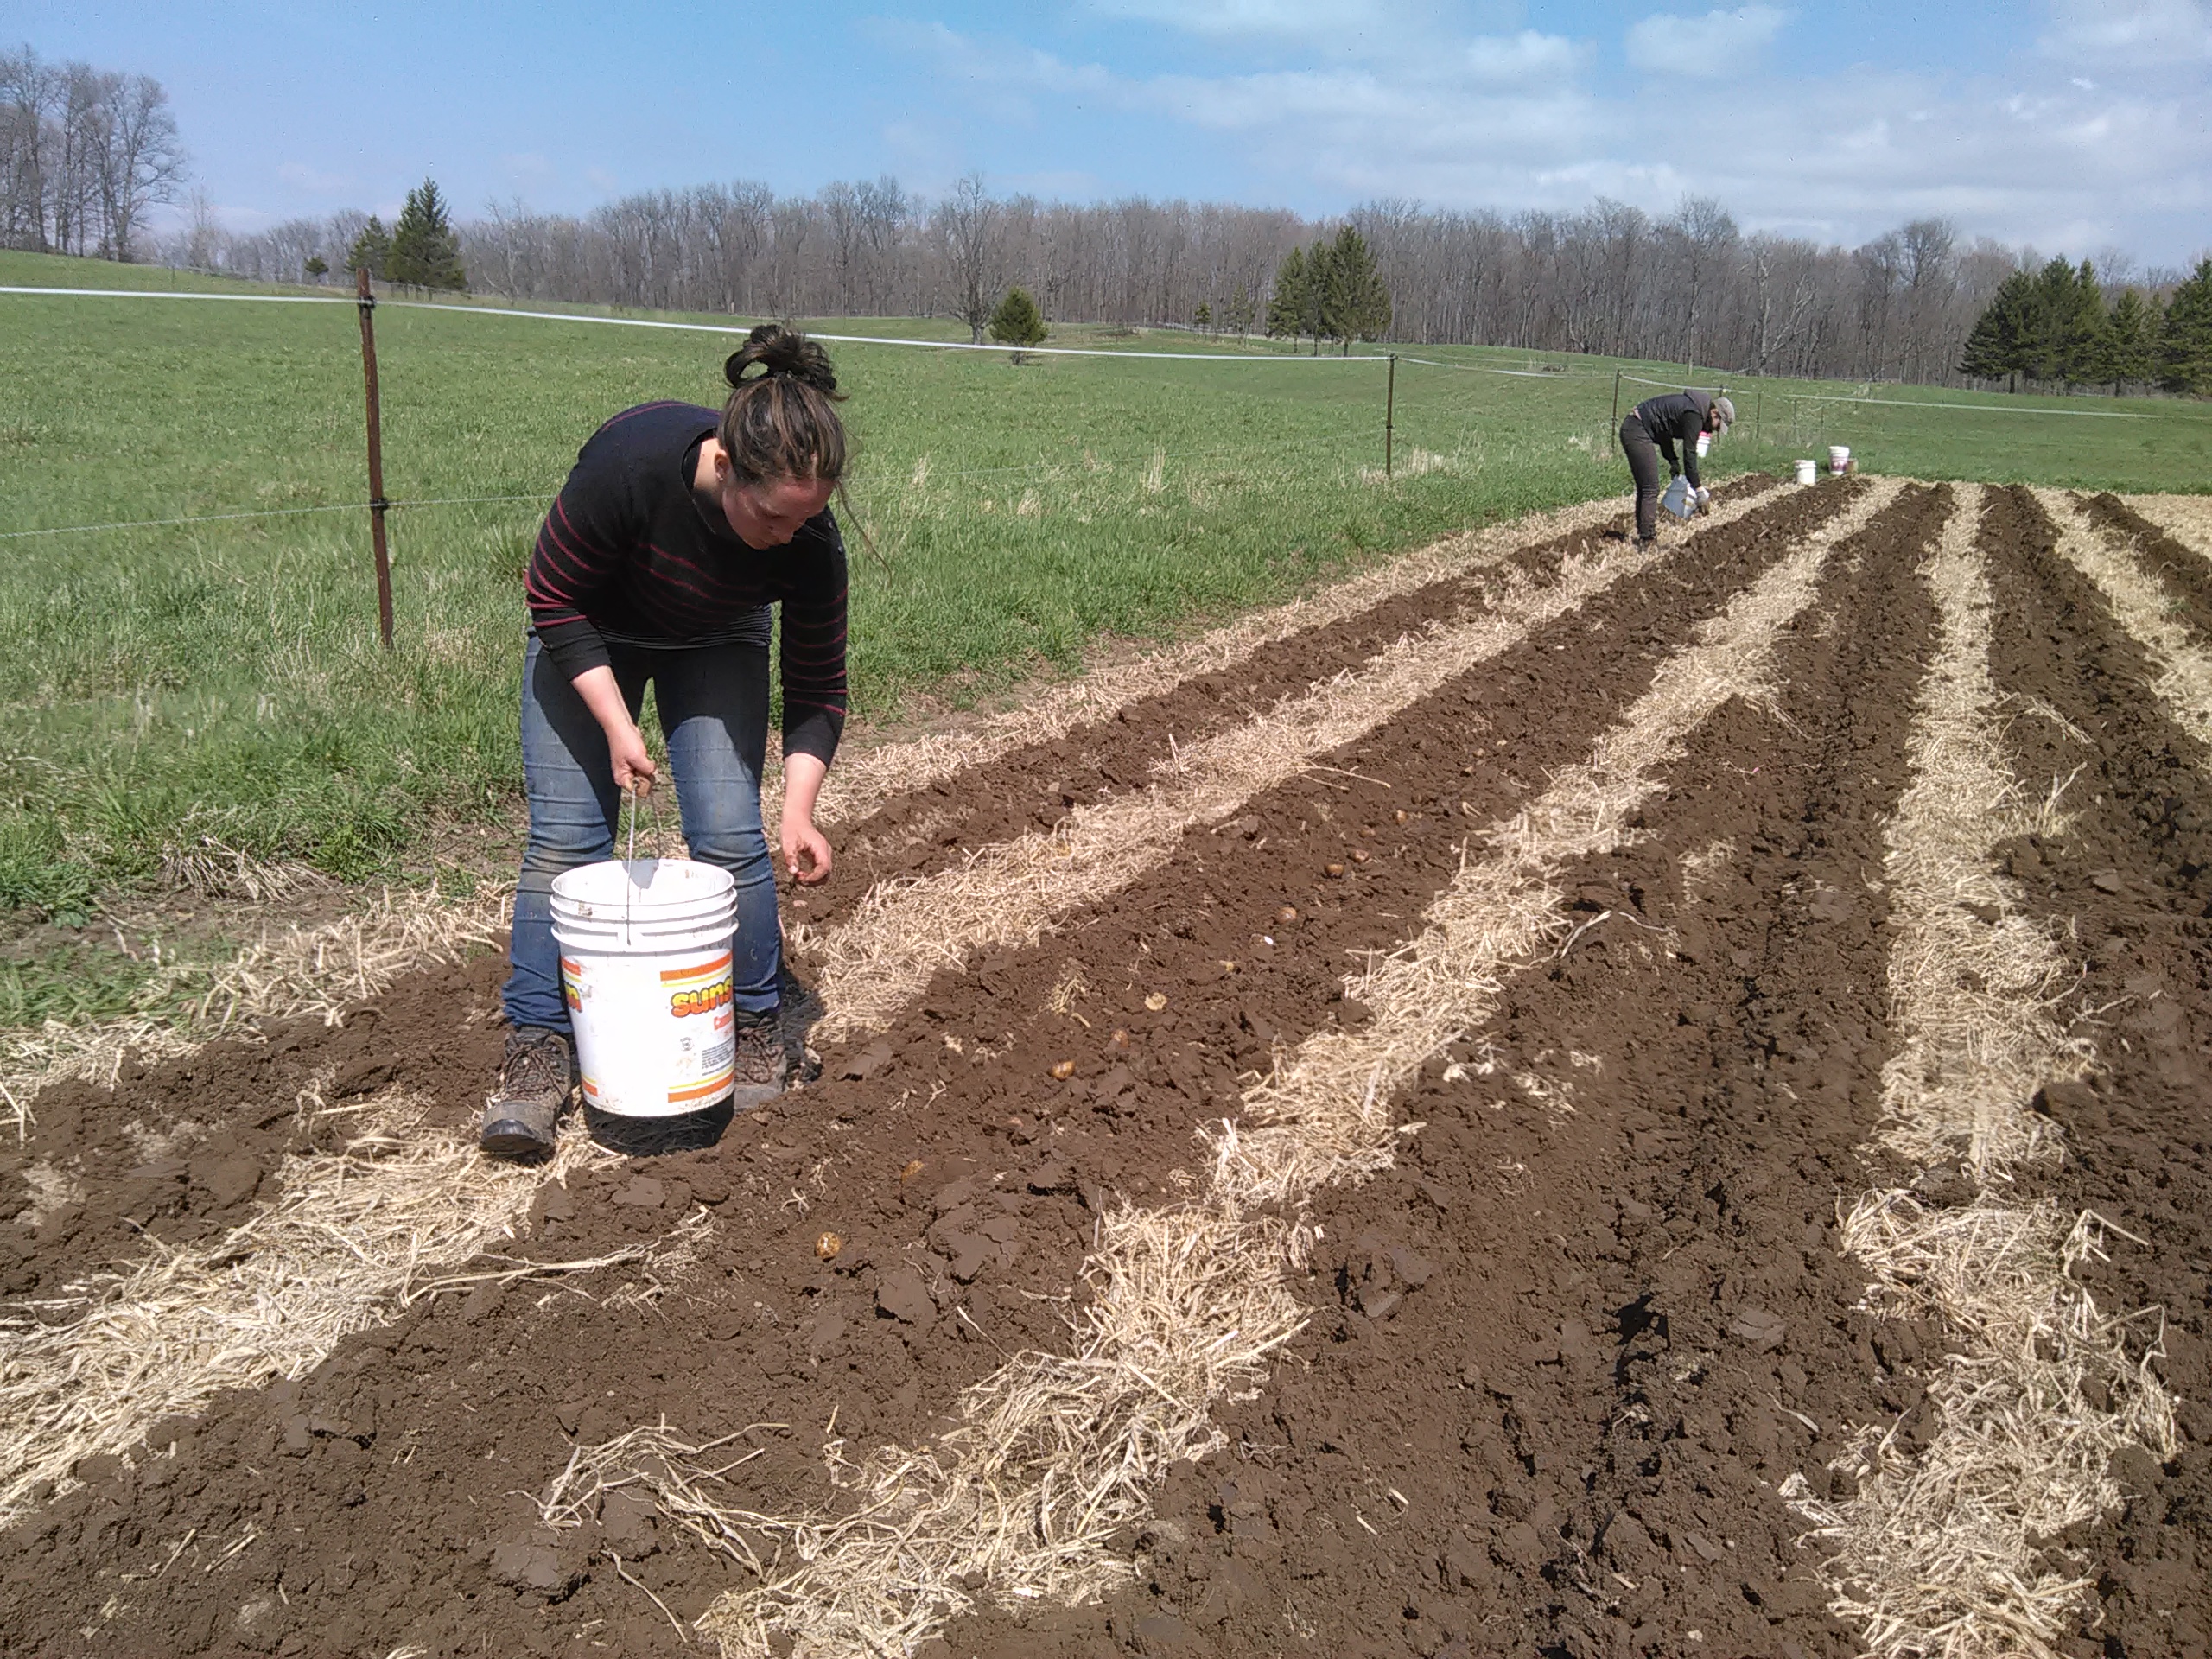
We have arrived at the last and 21st week of CSA pick-ups. After the last CSA pick-up our remaining interns will move on to other pursuits. We are very grateful for all their young energy and enthusiasm and wish them well with their future endeavours. One of the final jobs to tackle before our interns leave is the planting of garlic for the following year. For the past few years we have been no-till planting garlic into a cover crop of oats that will continue to grow into the fall and then winter kill. This year we added some daikon radish into the mix. The cover crop is a bit smaller because it was so dry in August/September, but we hope that it will have time to grow into the fall. To no-till plant the garlic, our draft horses open up a shallow trench with a riding cultivator and we drop in the cloves. Afterwards the riding cultivator closes in the the trench with discs and covers over the garlic. I realized when I was watching our granddaughter, Della, planting garlic that she is the eighth generation of my family to be working this land. I grew up listening to stories from my grandmother about how much she enjoyed farming here with horses. As I remember the story, after their children were grown my grandfather went to work for the railroad loading coal in Aylmer and my grandmother stayed home and farmed with a hired man. My Aunt Betty did all the cooking and my grandmother had the time of her life farming…My grandmother’s Haight ancestors cleared this land in the 1820’s.
Naomi Filling in the Trench and Covering Over GarlicGinger Grown in the Hoop House
I have heard about people planting ginger and growing it in hoop houses in the north and this year I decided to give it a try. In April when I bought the tubers to start in the greenhouse I also got some turmeric. Both grew fairly well and it was fun to dig up the plants and see what was there. I’m not sure about growing enough for the CSA, but I will enjoy using what I have grown this season.
All the fall grains and cover crops have come up well since the rain has returned. Ken tried a new experiment planting barley into a switch grass field. He removed the switch grass and no-tilled winter barley directly into the field. He is hoping that the barley will come off in time for the switch grass to grow again next year. Stay tuned to find out how that goes.
Naomi and Della Digging Turmeric
Pumpkin Honey
10 cups cooked strained mashed pumpkin
8 cups white sugar
1/2 pound butter
grated rind and juice of 4 lemons
Simmer all together 20 minutes or until thick – do not boil
Pour into hot sterile jam jars and seal . (I cover the jars with an inch of boiling water in a large pot and bring to a boil for 10 – 15 minutes. Remove from water and make sure the lids are tight.)
The old fashioned way is to boil the pumpkin in lightly salted water, drain and mash. You can microwave it and put it in the food processor if you wish. ( I just poke the pumpkin to break the skin and bake it whole in the oven until it is soft. I then let it cool, cut it open, remove the seeds, scoop out the pumpkin flesh and puree it in the food processor. Long Pie pumpkins work well for this recipe.)
The end of our CSA season is fast approaching. Our last CSA pick-ups are Tuesday, October 6 and Saturday, October 10. Our applications for the 2016 season are available now. Orchard Hill Farm application 2016 Kossak KohlrabiThis year we have succeeded in growing a variety of winter storage kohlrabi called Kossak. It is as big as a cabbage, but the great thing is that it still remains tender and crisp inside and stores very well! I have added a recipe below for Kohlrabi Fritters. Here are some other ideas:
dip in Hummus;
grate into coleslaw (add some red meat winter radish);
shave into salad;
throw into soup;
roast with other root vegetables.
Kohlrabi Fritters from the kitchen of Ellen Laing
1/2 lb. kohlrabi, grated
1 carrot or sweet potato, grated
1 egg
1 T. cornstarch
1/4 t. salt
1/4 t. cayenne
1/2 cup grape seed oil or canola oil
Squeeze the liquid from the kohlrabi and carrot/sweet potato with your hands or put in a tea towel and squeeze. Mix in a bowl with eggs, cornstarch, salt and Cayenne. Heat oil in a large skillet and drop large spoonfuls of Fritters into oil, fry until golden brown on each side.
We are about to start digging parsnips. For those of you who don’t know what to do with parsnips, I have reposted my parsnip cake recipe.
Parsnip Cake Recipe for 8 x 8 inch pan from the kitchen of Martha Laing
1 cup granulated sugar
1 cup flour
1/2 teaspoon fine sea salt
1 1/2 teaspoon baking powder
1 tsp cinnamon
1 tsp ginger
3/4 cup sunflower oil
2 eggs
1 1/2 cups grated parsnips
1/4 cup chopped pecans or walnuts
1/4 cup crystallized ginger
Preheat oven to 350 degrees F.
Combine sugar, flour, salt, baking powder, cinnamon, ginger; beat in oil until mixture is light in colour, about 3 minutes.
Beat in eggs, one at a time, beating for about 30 seconds after each addition. Add parsnips, mixing thoroughly.
Spread in well-greased and floured 8 x 8 inch baking dish. Bake for 50 – 55 minutes or until tester inserted in centre comes out clean. Let cool in pan before spreading with Cream Cheese Frosting.
* Recipe can be doubled for a 9 x 13 inch pan recipe. It can also be doubled and divided between 3 – 9 inch round cake pans for a layered cake. For a fancy cake, I put caramelized apples between the layers and add crystallized ginger pieces to the cream cheese icing.
Cream Cheese Icing for 8 x8 inch pan
8 oz cream cheese, softened
1/2 cup butter, softened
1 cup icing sugar, sifted
Milk
In mixing bowl, beat together cream cheese and butter, add enough milk to make fluffy spreadable consistency. Double recipe for layer cake.
Caramelized Apples for filling between layers of fancy cake
6 tablespoons butter
1/3 cup sugar
2 pounds Golden Delicious or Honey Crisp apples(or other firm apple variety), peeled cored, cut into 1/2 inch slices.
2/3 cup whipping cream
Melt butter in large skillet over medium heat; cover with sugar. Stir until sugar begins to melt, about 1 minute. Add apples. Cook until apples are brown and tender and juices form, about 10 – 15 minutes. Add cream and simmer until sauce thickens, about 5 minutes. Cool before assembling cake.
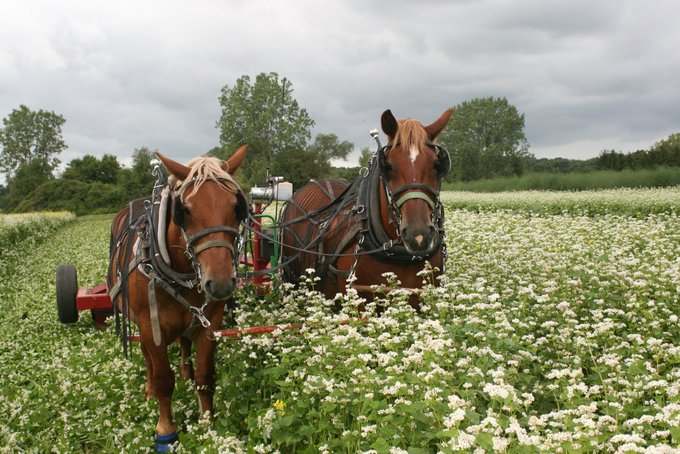
Suzie and Sonny Roller-Crimping Buckwheat Cover Crop
Roller-Crimper in ActionHorse Drawn No-Till Planter
Ken is continuing to pursue organic no-till planting. Conventional no-till planting uses herbicides to control weeds and or kill the cover crop. As the understanding of the value of cover crops and no-till has increased organic farmers have developed the roller-crimper to terminate growing cover crops. They crush the stems of the plants and leave the organic matter on the surface of the soil, allowing the life in the soil to explode as millions of micro organisms work to break down the organic matter. The field that our Suffolk horses, Suzie and Sonny, are roller-crimping what will be our squash field next season. The no-till planter was used to plant another cover crop of rye and Austrian peas into the crimped buckwheat. Next spring when the rye begins to shed pollen we will crimp the field again and transplant the small squash plants directly into the rye/pea mulch. Hopefully, the peas will help to fill in the gaps and allow for good ground cover for the squash vines to grow over. We may put down a strip of green mulch right around the plants to add some extra mulch and heat as the green matter breaks down it heats up.The added heat under the row cover gives them a jump start.We cover the squash with row cover to protect them from being eaten by cucumber beetle. We’ll see how it goes next year.
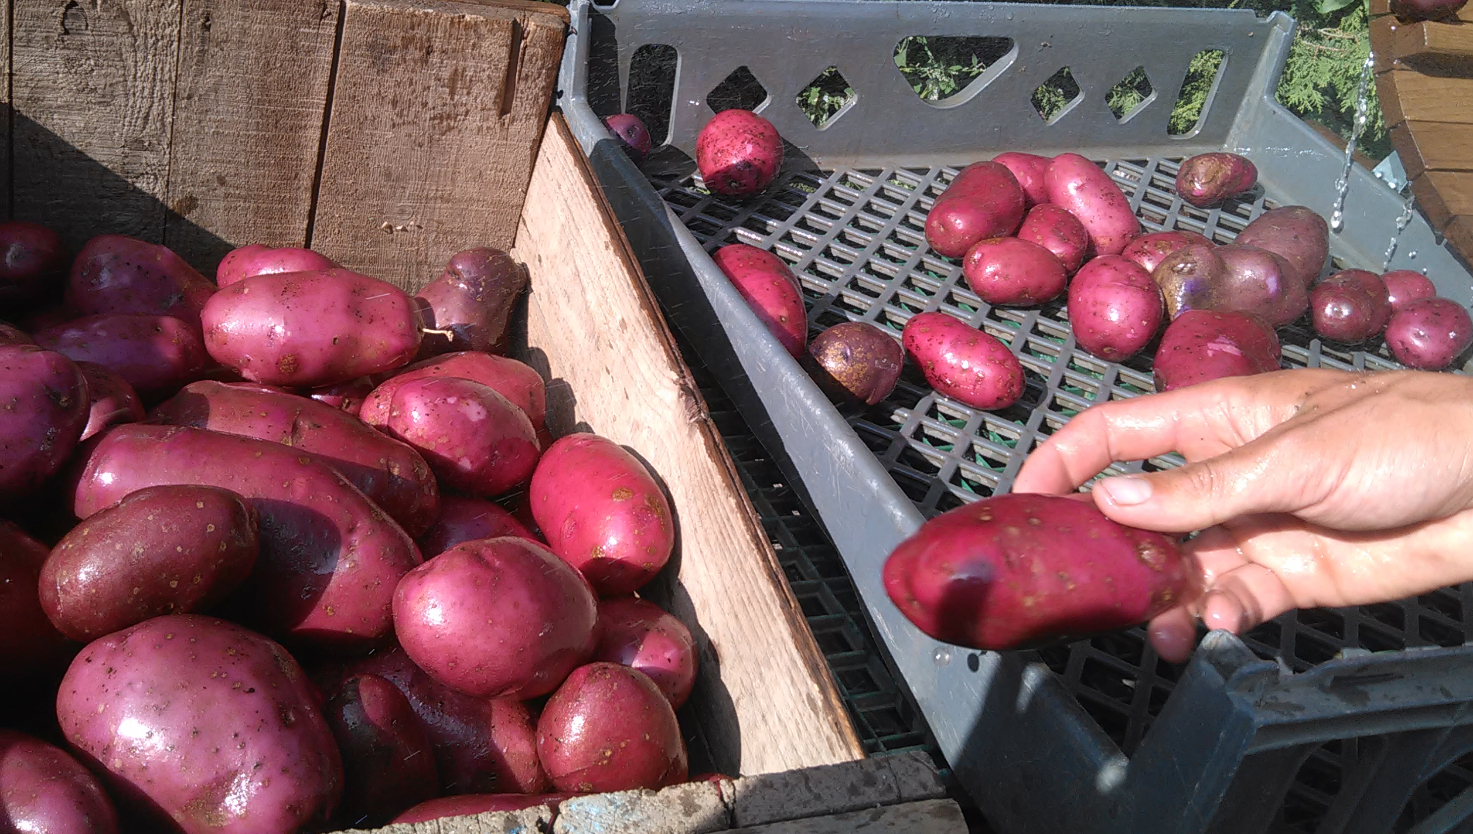
As we move into September on the farm the CSA pick-ups start to include more of the fall crops. Today we plan to harvest our first leeks and more squash and red and yellow peppers. The out door tomatoes are beautiful with all the range of colour. When we manage to hold off the late blight the heritage tomatoes have flavour that is unsurpassed. The potatoes are being dug. This year we have grown some purple and red fleshed potatoes that are a fun addition to our array of potato options.
This is something I grew up with and is an example of true Mennonite comfort food. The Ukrainians made Borsch, and the Mennonites of the Ukraine modified the recipe substituting cabbage as the main ingredient rather than beets. This thick, hearty soup with a sweet, slightly spicy tomato broth is often served at large gatherings (because it makes so much), in fall and winter as a main course. Every Oma has her own twist to this recipe and claims it`s never as good as the last time they made it (typical Mennonite modesty). It is often served with zwiebach (traditional homemade buns) but goes great with any homemade bread (hint, hint)!
Ingredients:
1 kg beef soup bone, with lots of meat ( pork works well too)
8 cups or 2 litres of water
2-4 carrots, sliced thinly
4 medium potatoes, cubed
1 large (or 2 medium) onions, chopped
1 medium head of cabbage, chopped finely
284ml can of tomato soup
500ml can of tomatoes, diced (optional)
red chillies (my mom often added Heinz chilli sauce)
fresh dill
salt and pepper to taste
Cover soup bones with water and simmer for several hours until meat is tender.
Remove the bone and shred the meat.
Add more water to measure a total of 8-10 cups of stock.
Add vegetables and seasonings.
Cook until vegetables are tender.
Add tomato soup, diced tomatoes (and a little chilli sauce or even ketchup for sweetness) along with shredded meat.
Bring to boil and then let simmer (it gets better the longer it simmers).
Serve with sour cream and fresh baked bread.
Enjoy!
Horse Drawn No-Till PlanterRed Fleshed Potatoes Being WashedOutdoor Tomatoes are ReadyFarm RainbowPotatoes!
The season is marching on and we are ready to start harvesting our fall bearing raspberries. Each year seems to bring something new for us to deal with. Last year we saw the arrival of Spotted Wing Drosophila in our raspberries. It is a tiny fruit fly originating in Southeast Asia. It arrived on the west coast about 6-7 years ago and gradually made its way across the continent. It lays an egg in the fruit before it is ripe and ruins the infected fruit. We pruned the raspberries to open up the canes to allow for more air movement. Apparently the spotted wing drosophila prefers a dark damp environment. It also opens it up for the natural predators to see the spotted wing drosophila. It is frustrating for us and challenging! We will have to wait and see if all our pruning efforts make a difference.
Harvesting BrassicasMesh Row Cover Over Cabbbage to Exclude Swede MidgeLast year we also had swede midge in our brassicas for the first time. It is a tiny fly that lays its eggs in the growing point of broccoli, cabbage, rutabaga turnip and ruins the crops. It also comes from Asia and was first found in Ontario in 2000. As organic farmers the only control is to cover everything with row cover to physically exclude them. We have invested in large sheets of row cover this year and have succeeded in producing some beautiful broccoli, cabbage and cauliflower. It is a lot of extra expense and labour to cover and uncover the crops for cultivation and harvest, but it is satisfying to win the battle with a new insect and to be able to continue to produce organically grown brassicas for our CSA customers.
Sometimes our interns express an interest in a particular aspect of farming farming and we try to provide an opportunity for them to explore their interest. This year Charlotte came back for a second season and really wanted to milk a cow. We purchased Utah and Charlotte has been milking her twice a day all summer. She has been making butter, yogurt and fresh cheese on a regular basis. The laying hens and our composting pig, Joe Pickle, have been enjoying extra milk and whey. Cockscomb CelosiaJeanne has been looking after the flowers and has spent many hours seeding, planting, weeding and mulching in the side garden for the cut-your-own flowers for the CSA. She would like to have a flower CSA in Quebec in the future. One of the flowers she wanted to try growing was Cockscomb Celosia. We purchased the seed and she grew the transplants in the greenhouse and planted it out. It is fun to see the exotic looking flower in the garden.
From CSA member Cheryl Losch:
Canadian Living gets the nod for this one, but we like that it contains just about everything in our current Orchard Hill share.
Plus we like the flexibility – I’m not an olive lover, so don’t use them; and any available greens work just fine.
Tear off a chunk of your favourite La Houlette de vie Bakery bread and you’ve got a great summer meal.
Potato Salad Nicoise Dinner
Portion size 4
14 mini new potatoes, quartered (about 1 lb/500 g)
2 cups (500 mL) green beans, trimmed
3 tbsp (45 mL) extra-virgin olive oil
3 tbsp (45 mL) lemon juice
1 tsp (5 mL) Dijon mustard
1/2 tsp (2 mL) dried basil
1/2 tsp (2 mL) salt
1/4 tsp (1 mL) pepper
2 cups (500 mL) baby spinach leaves
1 cup (250 mL) grape tomatoes, halved
1/4 cup (60 mL) oil-cured black olives, halved and pitted
half sweet red pepper, diced
4 hard-cooked eggs, sliced
Preparation
In large pot of boiling salted water, cover and cook potatoes until almost tender, about 10 minutes. Add green beans; boil until tender-crisp, about 4 minutes. Drain.
Meanwhile, in large bowl, whisk together olive oil, lemon juice, mustard, basil, salt and pepper. Add potato mixture, spinach, grape tomatoes, black olives and red pepper;
toss to coat. Top with eggs. CSA Cut-Your-Own Flower GardenSunflowersGladiolas for CSA CustomersCSA TomatoesOnions Freshly Pulled from CSA Garden
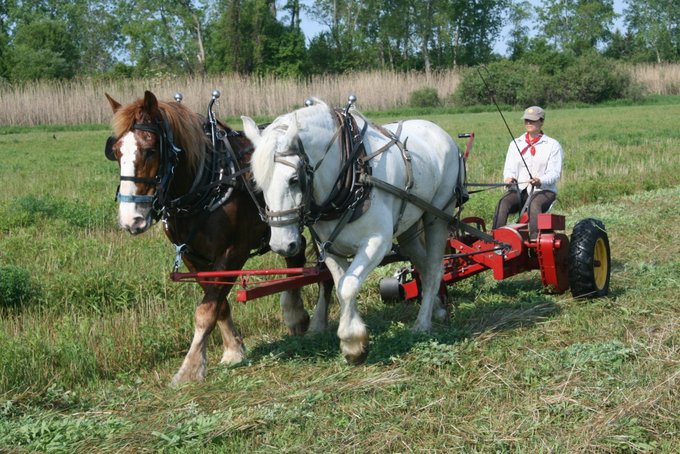
Garlic CuringWe managed to do our garlic harvest in record time today. Two hours from start to finish! Approximately 3800 garlic bulbs pulled and hung up to cure. Using our new root lifter made the whole process easier than ever! Cultivating between the rows of corn with a single row cultivator.The sweet corn has been cultivated using a single row cultivator pulled by a horse being ridden. It is one of the few times we ride our draft horses. The aisles are then seeded down to a cover crop and cultivated again. The cover crop will grow up and keep the weeds from growing. After the corn is finished we will mow off the corn and the clover will grow on to fix nitrogen. The next big job for the sweet corn is to put up an electric fence around it to keep the racoons from eating it. They wait until it is ripe and then call in all their friends for a big party! It’s crazy how much damage they can do in one night. Ken thinks that if we lined up all the coons in the neighbourhood nose to tail they would stretch all around the block! We often see their little hand prints on the farm lane in the morning after they have been out carousing at night. Aden Planting Buckwheat with Ken’s Horse Drawn no-till Drill.Ken’s no till drill is working. Aden used it to plant a second crop of buckwheat into the cut off buckwheat cover crop. In next year’s CSA garden area Ken also rolled a cover crop of peas, oats and barley and planted a mixed cover crop of soybeans, millet, sun hemp and sunflower seeds into the mulch. Later this season we will divide the field up into different areas depending on what is being planted there next year and plant different cover crops. We are trying to do this without ploughing or discing in between crops with the new no till drill. Leaving the mulch that is created to add organic matter to the soil bed. Time will tell.
We have had some beautiful cauliflower coming off our early planting and there is more on the way. Here is a recipe from CSA member Sarah Van Pelt:
Topping:
1 large head of cauliflower
3 Tbsp butter
1/4 tsp fine sea salt
1/2 Tbsp dried or fresh parsley
Sprinkle of pepper
Sprinkle of garlic powder
1 c mozzaralla or cheddar cheese
2 Tbsp parmesan cheese
Paprika
Base:
1lb lean ground beef
1 onion, chopped
2 cloves of garlic, minced
2 carrots, chopped
2 Tbsp olive oil
2 stalks of celery, chopped
2 c mushrooms, sliced
1 Tbsp Worcestershire
1/2 c vegetable or beef broth
1/2 tsp soy sauce (if GF, make sure it is the kind with no gluten in it)
1/4 c bbq sauce (if GF, make sure it is the kind with no gluten in it)
1/2 Tbsp parsley
1 c frozen peas
1 c frozen corn
Instructions:
1. Cut cauliflower into florets, wash, cover with water in a pot, bring to boil, and
reduce to a gentle boil until mostly soft. Drain and let sit for 5 min. Blend it
with butter and spices until it has the consistency of mashed potatoes.
2. Preheat the oven to 350 degrees.
3. Brown the ground beef, onions, garlic and carrots.
4. Add celery and mushrooms to the meat and vegetables.
5. Add oil, salt, Worchestershire, broth, soy sauce, bbq sauce and parsley to the
meat and vegetables. Simmer until everything is cooked and some of the
liquid has cooked off (so it isn’t runny).
6. Add peas and corn to the meat and vegetables for another 5 minutes or so.
7. Spread the meat mixture into a 9×13 casserole dish. Top with mashed
cauliflower. Sprinkle with cheese and paprika. Bake for about 45 minutes.
Beets on a Bed of Beet Greens with Fresh Butter and VinegarThe first beets of the season are a treat. The greens on the young beets are delicious. I like to rinse them well and cook them like spinach. Over the bed of cooked beet greens I add the cooked beets. If they are small I leave them whole, larger beets can be sliced. To cook the beets leave them whole with the roots and tops on either boil or roast. After they are soft discard the skin with the root and top. Add butter to melt and sprinkle with rice vinegar and coarse salt.
Rose Cultivating PotatoesWe now have all the early transplants in. Both plantings of sweet corn transplants have been planted and the cultivating has begun. Our potatoes are up and they have been cultivated and hilled. All the interns had a go at cultivating with the two horse one row cultivator. I feel like we are poised ready for an explosion of produce. The broccoli and early cabbage are almost ready. The first summer squash and carrots are being harvested this week. Our hoop house cucumbers are starting and the peas, lettuce, greens and herbs are continuing to produce. Pretty soon we will be exploding out of the pick-up room.
The hay has been a challenge to make again this year, with all the rain. We have managed to squeeze in a few good loads into the barn. There is a field cut now now that is destined for the compost pile with all the rain last weekend. However, the rain will make everything else grow including the second cut on the hay fields that are already harvested.
The kale has been growing well with all the rain and cool weather. Here is a Kale recipe from CSA members Matthew and Ansley Ban Massaged Kale Salad with Feta Cheese
INGREDIENTS
1 bunch kale
3/4 teaspoon coarse kosher salt or sea salt
1/4 cup finely diced red onion
1/2 cup dried cranberries or raisins
3/4 cup small-diced apple
1/3 cup toasted sunflower seeds
1/4 cup olive oil
2 tablespoons red wine vinegar
1/2 teaspoon sugar
1/3 cup crumbled Feta cheese
DIRECTIONS
Wash the kale and pat it dry. Slice off the stiff stems below the leaves and continue slicing the stem away from the leaf until you have cut a thin v-shape into the kale leaf and removed the tough stem all the way up. Stack the kale leaves two or three at a time, roll them up, and slice the leaves into thin ribbons.
Place the kale ribbons in a large mixing bowl. Add the salt and massage it into the kale with your hands for two minutes. You’ll notice the kale start to turn a darker green and the texture of the kale will begin to soften a bit.
Toss in the red onions, cranberries or raisins, apples, and sunflower seeds. In a small bowl, whisk together the oil, vinegar and sugar. Pour over the salad and toss. Sprinkle feta cheese over the top and serve. The salad can be refrigerated for up to a day before serving (if doing this, refrigerate the salted kale separately from the other ingredients and toss the salad together an hour or two before serving). Naomi Hilling Potatoes
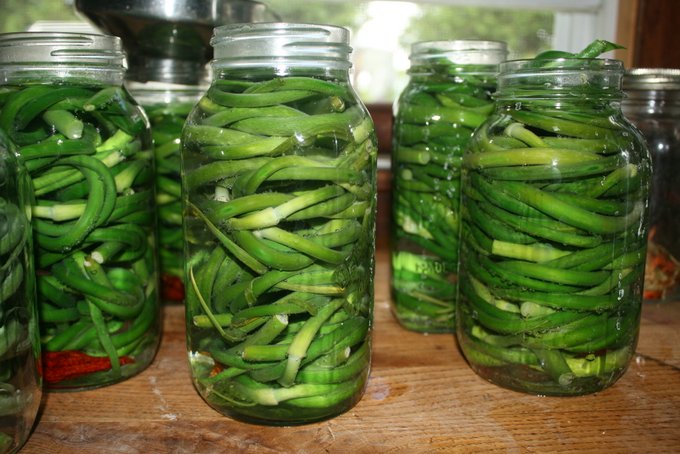
Garlic Scapes are the flower portion of the garlic plant. We remove them so the garlic can put energy into growing the bulb bigger. One fun thing to do with the scapes is to pickle them. I just use a brine like I would for dill pickles.Pickled Garlic Scapes
CSA member with First Wood Fired Oven Bread and CSA Basket for the Week!Wood Fired Oven with Face Started
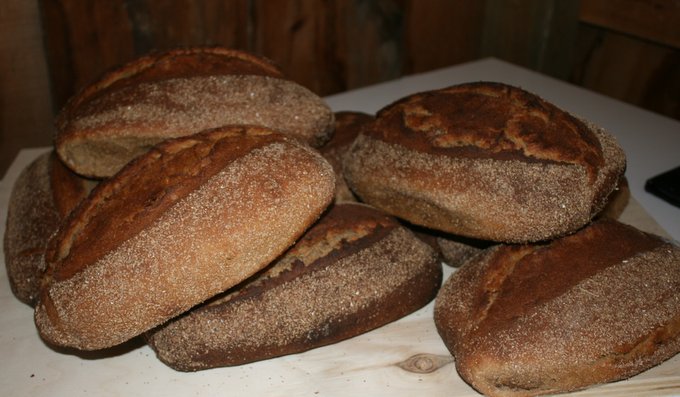
The Wood Fired Oven is finished enough for the first bread to be baked! The actual oven is finished, but the face of the oven still has to be completed. Making bread has become the priority for oven builder and baker, Seth Wiggin. He has been working over time to get his prep area ready to start producing bread for his LA HOULETTE de vie BAKERY. Bread will be on sale today at the St. Thomas Farmer’s Market and at our Farm for CSA Customers. Seth is setting up a Bread CSA to Start the beginning of July. More details on that front to follow.
First Bread Baked in the New Wood Fired Oven
Having the first beautiful loaves come out of the oven was amazingly rewarding, uplifting and exciting. It is hard to find the words to describe the feeling!
Jeanne Clipping Switch Grass Field with Queen and Ned
On the farm front, the CSA pick-ups are finishing out the second week today. We have all of our tender outdoor transplants in the field and our first hay of the year is in the barn! We have been busy too! There is lots of beautiful spinach in the CSA pick-ups and we had Spanakopita for supper last night with some of our fresh jersey cheese from Utah’s milk! She has settled into the routine here and has responded to Charlotte’s gentle handling. Last night I milked her and she walked with me to and from her pasture to the milking stall with ease.
SPANAKOPITA
1 Full bowl of Orchard Hill Farm spinach from pick-up room (washed well, drained and squeezed dry)
¼ cup olive oil
1 large onion, diced
6 green onions, diced (including 4 inches of green)
¼ cup fresh dill, chopped
1/8 tsp. freshly grated nutmeg
salt and pepper to taste
¼ lb. feta cheese, crumbled
2 eggs, lightly beaten
¼ lb. ricotta or cottage cheese
2 tablespoons butter, melted
1 tablespoons olive oil
10 sheets phyllo dough
Heat the olive oil in a deep sauté pan or large pot. Sauté the onions and green onions until tender. Add the spinach and dill and cook for 5 to 10 minutes until the spinach is wilted and heated through. Add the nutmeg and season with salt and pepper.
Remove from heat and set the spinach aside to cool.
In a large mixing bowl, combine the feta, eggs and ricotta (cottage) cheese. Add the cooled spinach mixture and mix until combined.
Combine the melted butter with the olive oil in a bowl. Using a pastry brush, lightly grease a 9 x 12 rectangular pan.
Unwrap the phyllo and carefully remove the phyllo roll from the plastic sleeve. Most packages come in a 12 x 18 inch sheets when opened fully. Using scissors or sharp knife, cut the sheets in half to make two stacks of 9 x12 inch sheets. To prevent drying return the unneeded sheets to the plastic sleeve for future use.
Prepare the Pie:
Layer 10 sheets of phyllo on the bottom of the pan making sure to brush each sheet with the butter/olive oil mixture.
Before baking score the top layer of phyllo to enable easier cutting of pieces later. Bake in a preheated 350 degree oven for approximately 20 to 25 minutes of cooking time until the top turns a deep golden brown.
Bunching Asparagus for the First CSA Pick-Up of the Season
The CSA pick-ups are under way. We have asparagus to start the season and I have posted a couple of recipes at the end of this blog entry to give some new ideas for using it. Our CSA gardens are growing and the early seedings have come up and have been weeded. We are waiting to transplant the tender plants until tonight’s possible frost has past. Hopefully, it will warm up and stay warm after that. The ground has dried out without rain and we have irrigated the garden to keep plants growing. There is rain in the forecast for next week and hopefully it won’t miss us.
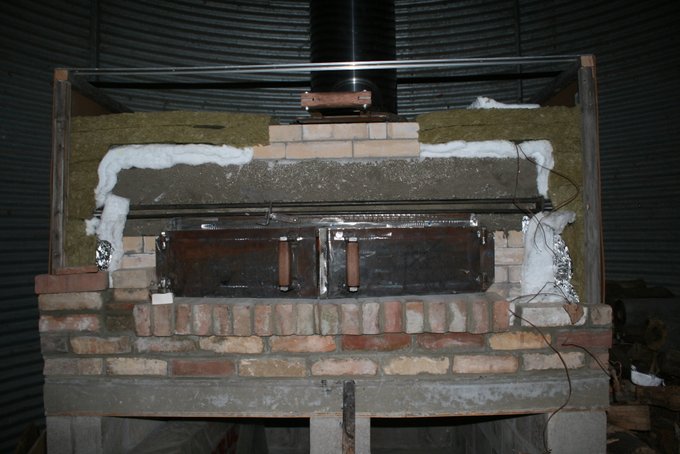
Insulation around Chimney In Place
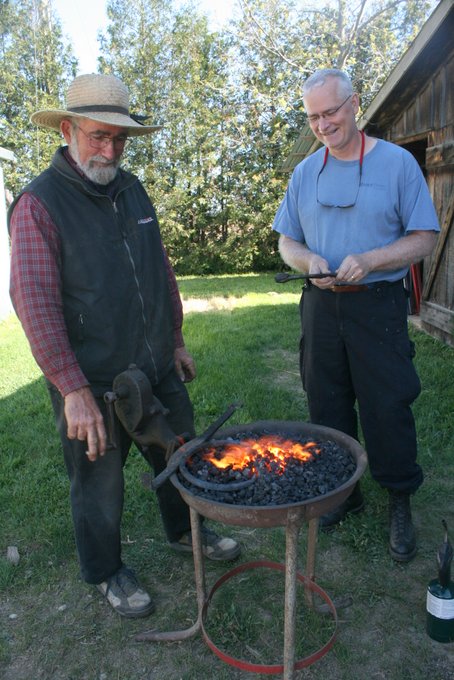
Forging Brackets for Wood Fired Oven ChimneyThe wood fired oven is finishing up. The insulation has been put all around and the damper has been made. Today Ken is forge-bending some brackets to brace the chimney before it is installed. He will then make some insulated doors and Seth will build a brick face on the oven and it will be ready to light the first fire. The plan is to heat it slowly with a small fire so the bricks can dry slowly before the first hot firing. The idea with the oven is to have a lot of insulated thermal mass that will absorb the heat from the fire and then gradually release it while baking bread. Seth intends to have a fire for 6 hours then rake out the ashes and close it up to absorb the heat for 6 hours. He hopes it will retain enough heat to bake 5 batches of bread of 25 loaves each from one firing! It will take a while to get to know the oven, but it is exciting to see it all come together. The new stone flour mill has been tested and is ready to start grinding flour with the horse powered treadmill.
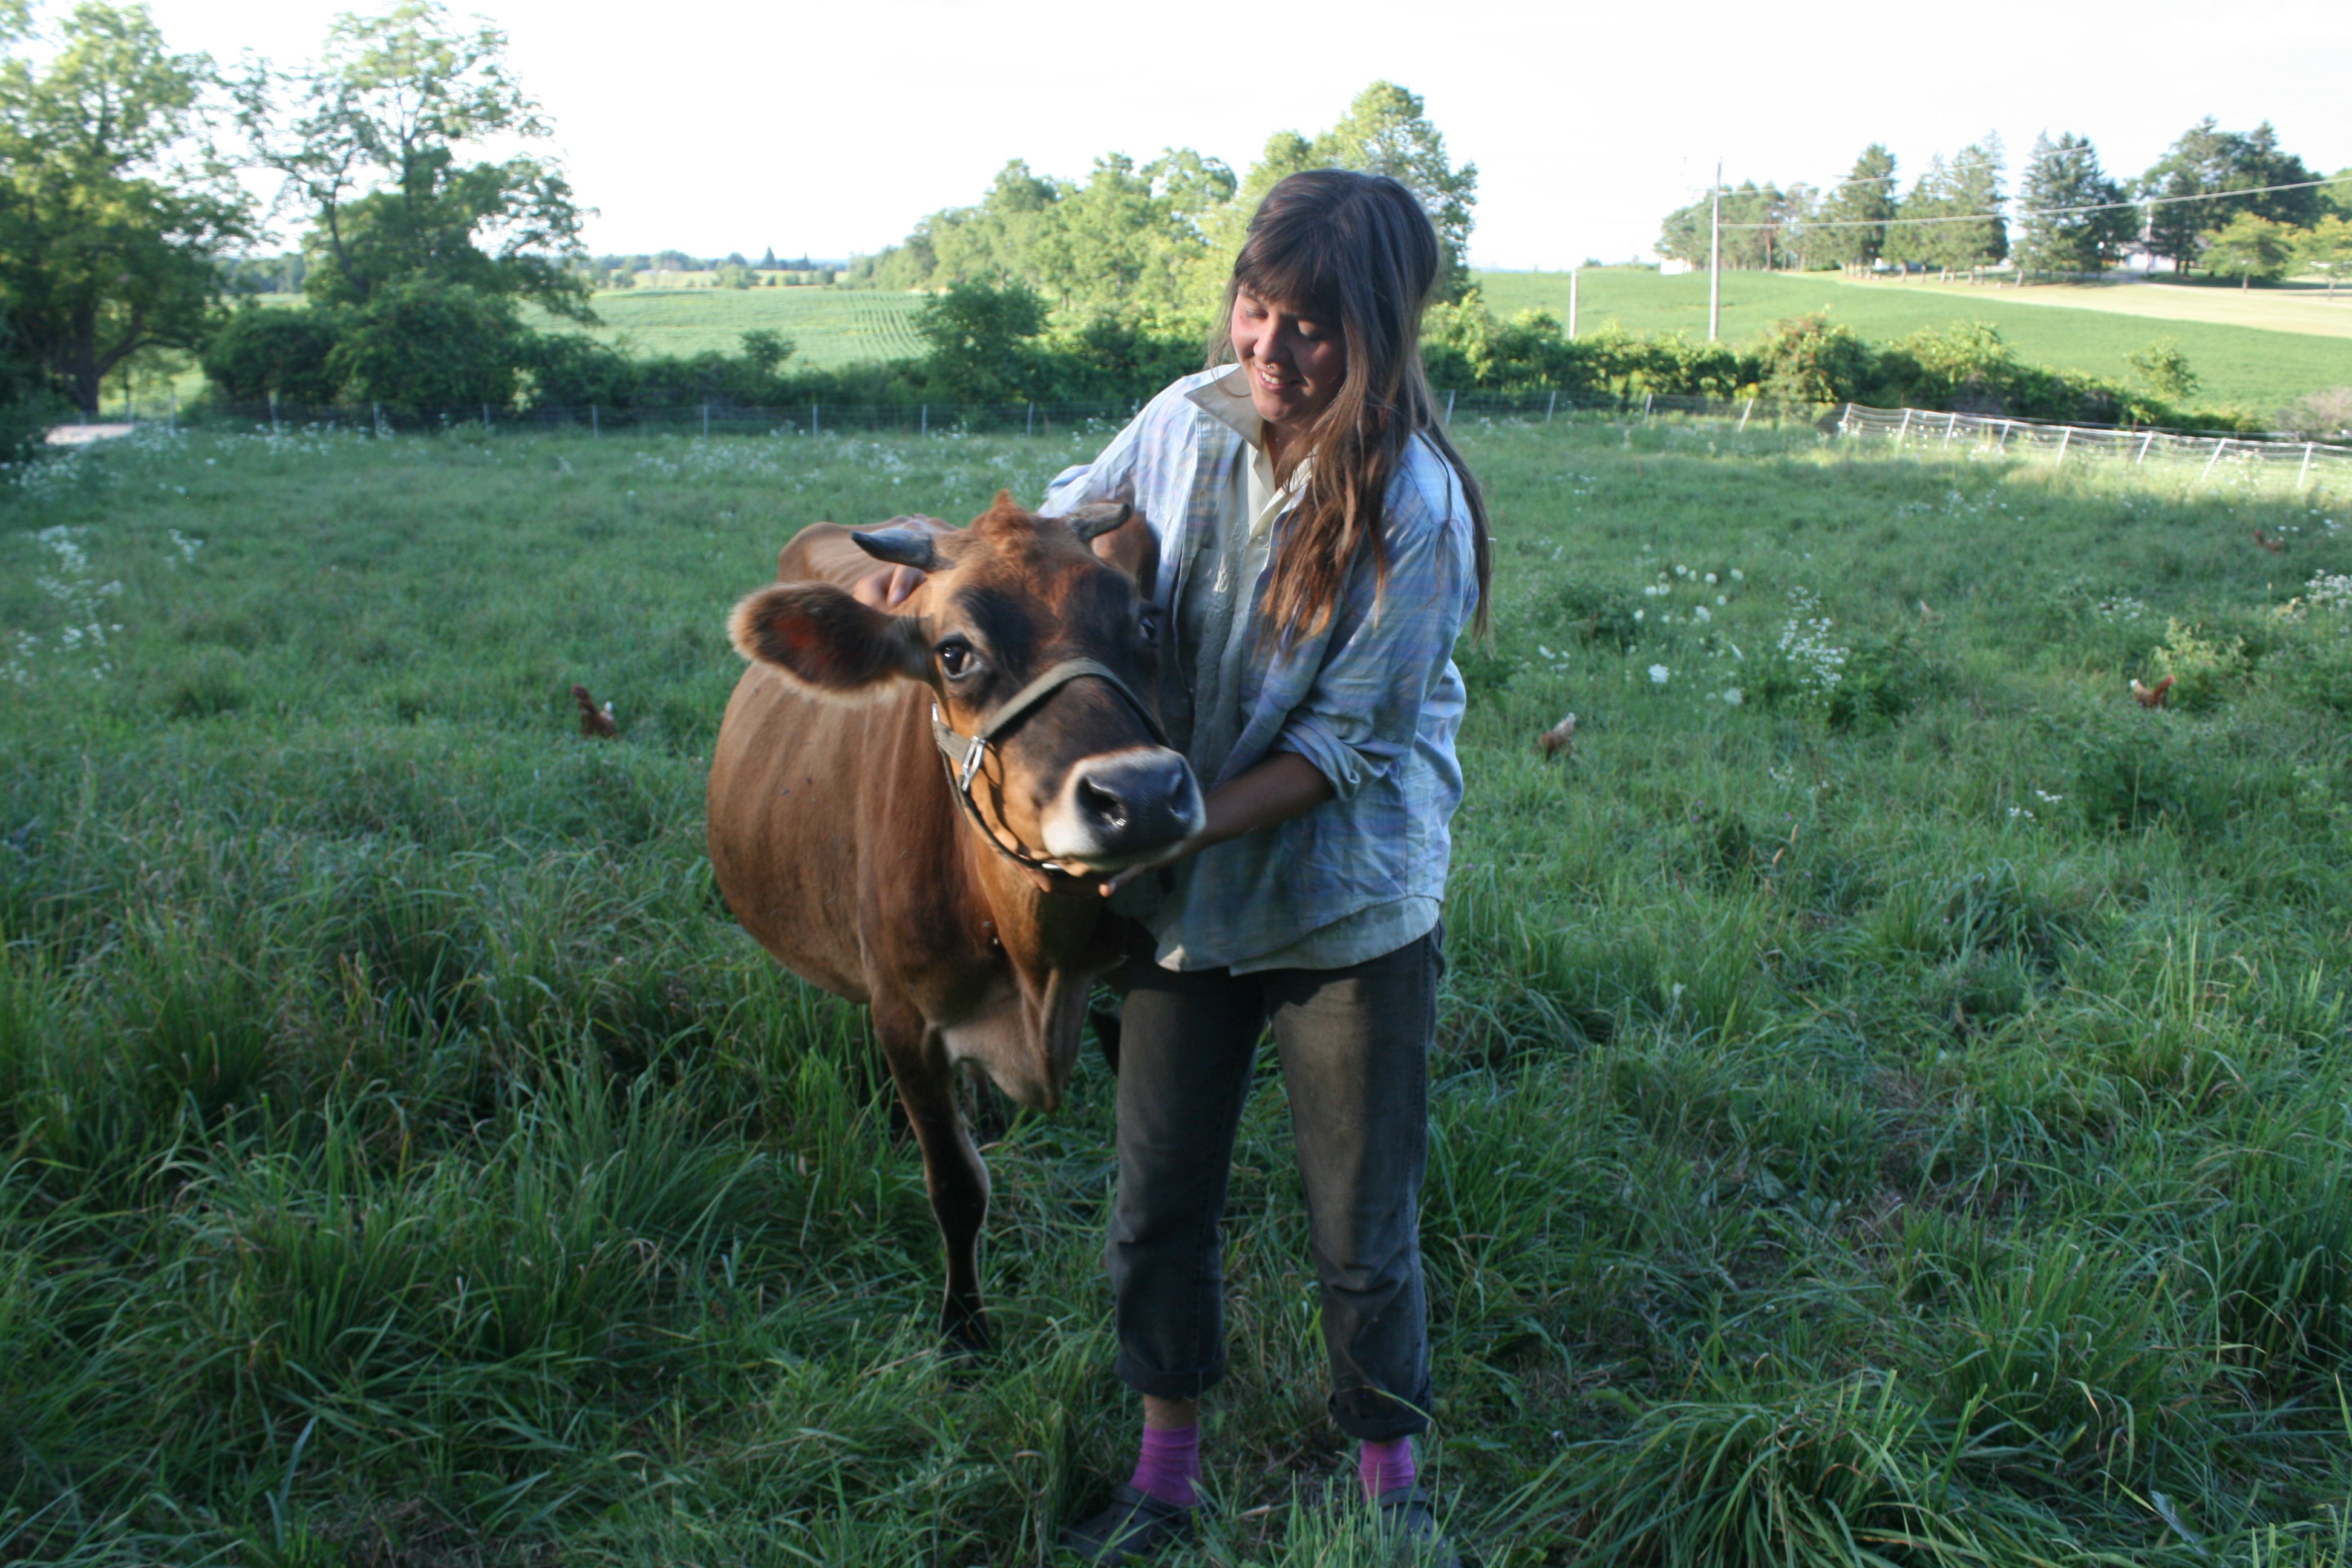
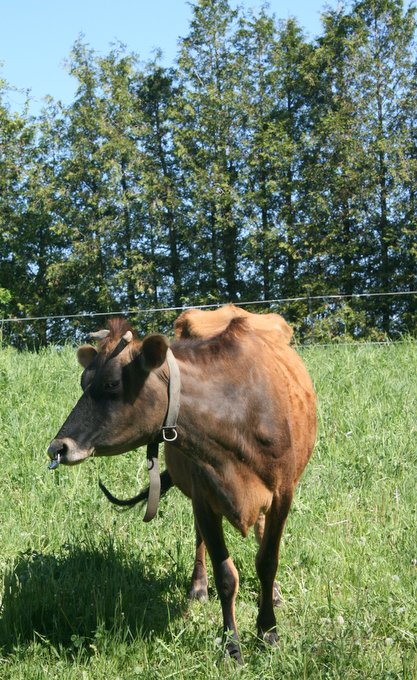
Introducing Utah our new Jersey Cow
We have added a jersey milk cow to the farm family. She is very hip with a nose ring, ear tattoo and the name “Utah”! Our second year intern, Charlotte, has returned to the farm this year and asked if she could have a cow project…Charlotte is finding her way with getting to know Utah, learning how to milk and then learning how to make butter, yogurt, and fresh cheese. Rose is making kefir and adding it to our shakes at breakfast. The next step is to try and make some hard cheese. It feels good to have a cow again and it certainly adds a bounty to the table at meal time. When Utah is cooperative enough to come in for milking on her own, the nose ring may have to go. She earns a lot of brownie points for standing well to be milked, but she is still getting used to her new surroundings and our routines. You can read between the lines on that one…Fortunately, after sourcing some replacement parts our little milking machine still works.
Sent to me by CSA member, Catherine Burr, Adapted from: Four Seasons – A year of Italian Food by Manuela Darling-Gansser
Asparagus with Melted Butter and Parmigiano
1 bunch of asparagus
50 g freshly grated parmigiano
30 g unsalted butter
sea salt and ground black pepper
Cook the asparagus until the stalks are still a bit crunchy. Do not overcook. Drain the asparagus and arrange on a heated serving dish.
Sprinkle the parmigiano on the tips of the asparagus. Melt the butter and, as soon as it is foaming, pour it over the parmigiano. (The heat of the butter will melt the cheese and make a delicious crust.) Add a little salt and pepper. Serve at once with some crunchy Italian ciabatta bread.
Variation
For a more substantial meal you can fry 2 organic eggs per person and serve them on the plate with asparagus. Make sure the yolks are still very runny.
This is a recipe from a cookbook written by our daughter, Ellen Laing.
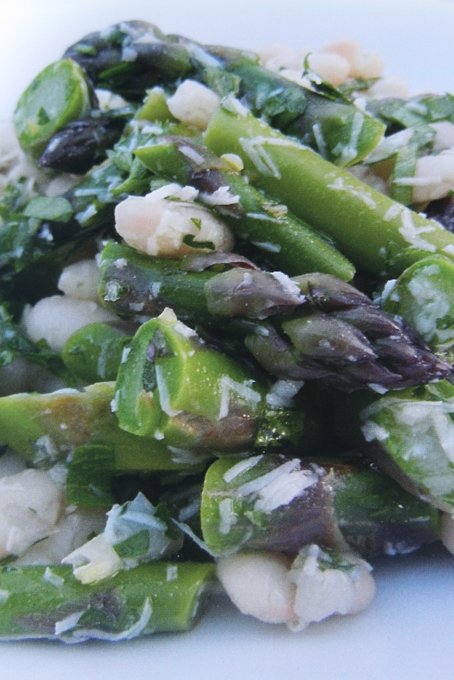
Asparagus White Bean Salad
Asparagus White Bean Salad
1 bunch asparagus cut in pieces about twice the size of the beans
2 Cups cooked white beans (canned would be fine, drained & rinsed)
1/3 Cup cubed cotija cheese (You can also use feta)
Zest of one lemon, minced
Juice of at least half of a lemon (more if you like)
1 small shallot, minced (you can use a green onion)
¼ cup parsley
1 Tablespoons mint, chopped
2-3 Tablespoons olive oil
salt & pepper
Boil some water to blanch the asparagus. Salt the water so that the asparagus comes out tasty. Throw the asparagus in there, and cook just so that the raw flavour goes away –just keep fishing them out and tasting them. Try to keep them bright green and crunchy. Usually this happens before the water comes back to a boil. Drain and cool the asparagus.
Toss everything in a bowl & adjust the seasoning if necessary. It is best to refrigerate for several hours before serving so the flavours can blend.
May is always a big month of planting. We do direct seeding as well as transplanting both outdoors and inside of our hoop houses. Some plants are more cold hardy and can go out before the danger of frost has past. Our onions and leeks are transplanted already. The hoop house tomatoes and cucumbers have also been planted, because they are inside the hoop house and protected. The hoop house pac choi and head lettuce are growing well and after they are harvested the tomatoes and cucumbers will grow on. We have early cabbage and broccoli that are waiting to be transplanted. The roots need to be well established for the transplants to work well with our horse drawn transplanter. There is also a long list of fennel, celery, celeriac, kale, kohlrabi, radicchio, green onions and head lettuce that are waiting to be transplanted. We have started our outdoor annual cutting flowers, sweet potatoes, cucumbers, melons, peppers, eggplant and tomatoes in the greenhouse that have to wait until after the danger of frost has past before they can be planted. Needless to say, our greenhouse is bursting at the seams as we shuffle plants around to make room for more. In the meantime, we have planted the strawberries for 2016 and the potatoes for this year. Another succession planting of direct seeded beets, carrots, peas, leaf lettuce, radishes and spinach have been planted in the main garden and covered with row cover to bring them along quickly. The 2016 main CSA garden has also been worked up and planted to an oat/barley/pea cover crop.
Jeanne Tremblay Intern from Quebec
Jeanne Tremblay has come from Quebec to intern with us for the remainder of the season. Jeanne comes with teamster skills. She interned at another CRAFT farm in Ontario two years ago.She has also just completed an agricultural business course at Victoriaville in Quebec. She hopes to return to Quebec and start an organic vegetable and flower CSA in the future. I look forward to having an intern with a special interest in cut flower production. We have ordered some additional flowers to try this season for our CSA cutting garden in the side yard.
Seth and Jim at Work Building Arch on the Wood Fired Oven
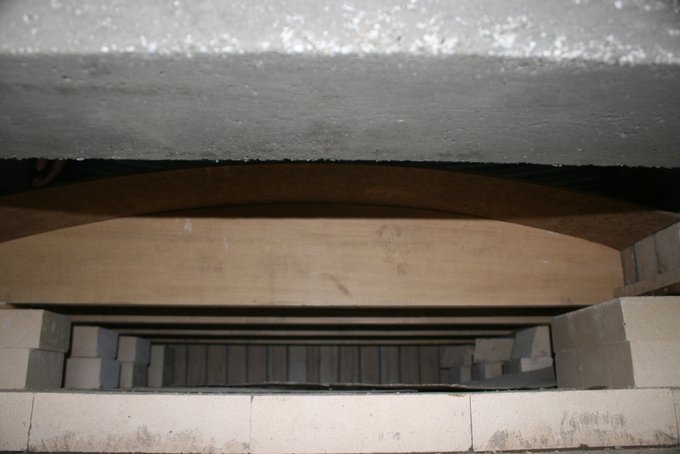
Seth has been working hard on the wood fired oven with good help from Jim. He is learning as he goes and doing a careful job. The process is quite involved with one stage completed before the next can be started. The foundation support and the sides of the oven have been built. The floor of the oven with volcanic insulation under it, to keep the heat in, has been laid. The lintel over the door with small metal shards incorporated for strength is finished. Today Seth and Jim are setting the arch fire brick in place. The arch is supported with special wooden framing that will be removed once the mortar between the arch bricks sets.
We have set the start dates for our CSA season as follows: FIRST TUESDAY PICK-UP: MAY 19
FIRST SATURDAY PICK-UP: MAY 23
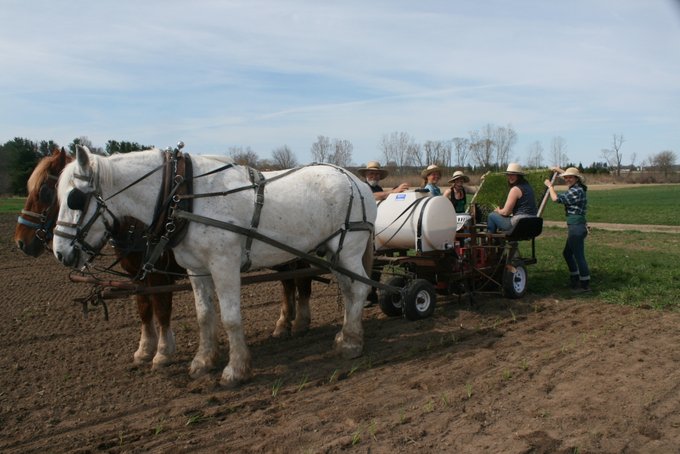
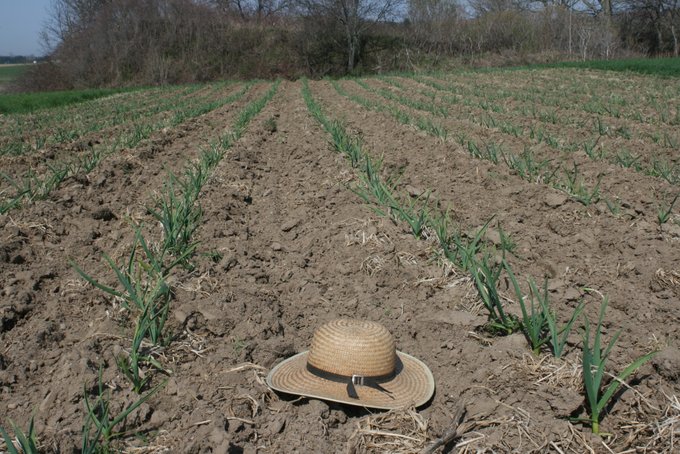
Queen and Ned Opening up the Furrows for Seed Potatoes in No-Till Section of FieldAlina and Caesar Waiting to Plant PotatoesRose and Jeanne Planting PotatoesStart of the Arch from AboveWooden Supports for Arch in Wood Fired Oven to be Removed after the Fire Bricks are in PlaceJeanne and Alina Weeding Flower GardensGarlic is Growing!Jeanne Weeding Pac Choi and Lettuce in Hoop HouseCaesar and Mosquito Waiting for a Wagon Ride